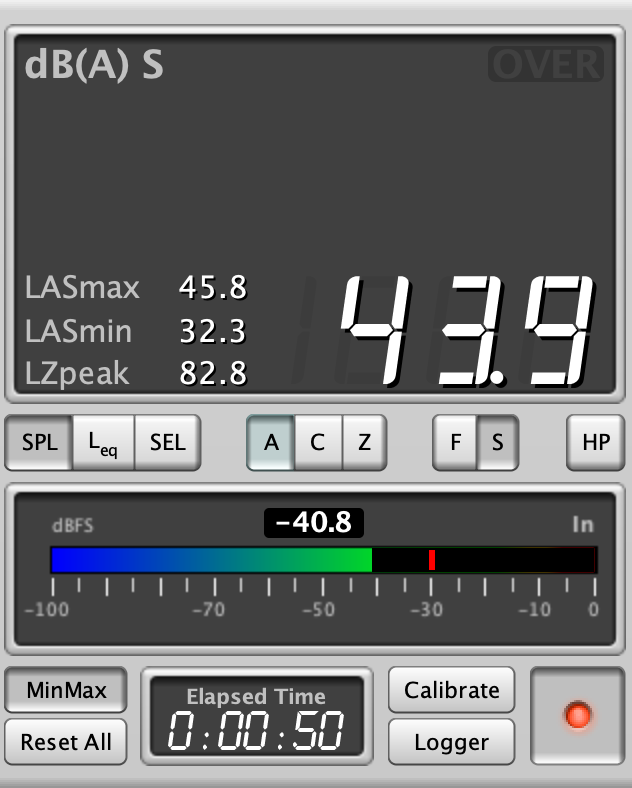
REW - SPL meter
ADAM S2V + SUB10 MKII ROOM CALIBRATE - STEP 2
"excessing with phases" - in the 2nd part of my room calibration "hands on experience" i go further marry my Adam S2V with my room
This is step 1 of my experience with my ADAM S2V near field monitors and my first basic room calibration steps
after "burning in" my Adam S2V a bit over some hours of usage (while "burning" doesnt mean high levels or really fire / heat...ß) they should got their optimum response. brand new monitors tend to change their response within the first hours of usage - so it may makes sense to do a room correction after such a timespan (again).
so now it is a good time for my 2nd part of my room calibration blog project - first part.
i'm not an expert in room acoustics and audio correction - these guys may go much deeper into details then i am, but my target is to use the existing Adam S2V room correction to do at least basic enhancements for my personal application and collect some experience about the Adams and my rooms. it is not clear if i will do future corrections / changes to my eq profile after some time of more experience (will note it here in a 3rd step, if so..ß).
preparations
before going to do something in more detail of room correction tweakin it makes sense to think about the targets, because any kind of room correction has to be done with the target application / usage of the monitors in mind.
- on my desk i need to most accurate signal on a very small sweet spot - but around 30-50cm outside of the spot the sound should be good as well.
- here, in a project studio, i do not work with one calibrated volume level - but i have multiple "reference" levels (which are marked on monitor controller pots) to work on. as the rooms influence tend to rise with the volume / levels, i have to find a compromise here which fits for all levels (i.e. by applying only slight changes).
- for mixing and mastering jobs, i do not want get "cheated" by different room corrections on both monitors (each monitor "deliver" his - more or less - slightly own spectrum to your sweet spot) when moving my head a bit. my room is not symmetric at all - so i want the same EQ curves / room correction on both sides.
- as explained in step1, i have a monitor setup with a Adam sub 10 subwoofer but only the newer Adam S2V has room correction by Adam S-Control builtin. most bass energy under 75 Hz comes from the subwoofer - so it makes less sense to me to use the monitors room correction to "tweak" here. if you use your Adam S2V without any additional sub, you might / should use Adam S Control in the lows too.
depending from this you have to decide what you measure: one after another speaker or all at once (while "all at once" could mean to "combine" the two single monitor measurements of both sides). even if you want to get a profile for both sides, it makes sense to do some "PURE" measurements side by side to get a view where the main differences are and/or affects the sum result.
prerequisites
- setup as prepared in the first step)
- for a volume calibrated setup: a SPL meter with 0.1 step resolution. (i have a relative cheap one for 25 bucks which is not very exact, but OK for my case - with measuring noise. smartphone SPL meter might be a secondary option for at least "loose orientation", but don't expect exact results.
it may makes sense to calibrate the level / SPL of your REW measurement setup - this is important if you want to work with a volume / SPL calibrated monitor setup, want to use the REW EQ modeller or if you want to read very correct db values for the room correction to directly apply (what only works with spectrum regions where phase at +-0, but more later...).
volume calibration
for SPL calibration, enable your SPL meter + click "SPL meter" -> "calibrate" (check if the correct/regarding/same SPL weighting of your SPL meter is selected).
without any SPL meter: make sure your speaker volume is as loud playing as you typically want to hear / work with as the "required" room correction typically rises with louder usage.
placement / location
room correction is typically one of the last - but still important / very helpful - option. before applied, more or less "basic physical" things should be done / checked: proper placement and acoustic treatment. in situations or on locations where such "physical" optimizations are not possible, room correction is getting your primary life saver.
REW contains a very helpful room simulator for room modes (which - by principle - works on rectangular rooms only). If you have a rectangular room it may help to find your most important / main room modes. if you plan to use a sub, it may help to find the (theoretically) ideal place for it by moving it with your mouse in the model of your room. to get optimum results, measurements should be as exact as possible - even a "few centimeter / inch" could form a new frequency profile with a wild dynamic.
try / play with different hear spots and see which main changes in the frequency spectrum depend from the location of your head only. addressing such issues by room correction will shrink your sweet spot while (may) giving you a even more "corrected" experience in this spot, while more distorted "outside" of the spot. decide here for you the size of the target sweet spot (which could be "shrinked" down to a few inch / centimeter if you "drive it crazy"...
if you have the luxury to find a near to ideal place for your S2V desk / nearfield mons, do that first - i.e. with the help of the room modeler.
i construated my desk as my room acoustic treatments years ago from hand (without any help of software) so it is nice to see how good my intentions / calculations was. generally my rules was:
- do not place the seat / "target sweet spot" near a wall nor the middle/center of anything (walls / edges / floor / tile etc.)
- do not place the monitors on a wall nor a edge nor in the middle/center of anything
- direct the mons toward the longest path in the room
but even if you are fixed to a place / local setup within your room, the room sim helps you to get a first idea of where you have to expect your main room modes as interferences by reflections behind, at the top and at the side walls between your ears and your mons in your setup. understanding at least basics where your "effects" in your measurements come from (and how your room modifies your audio experience) is crucial / helpful.
the room sim helps you to simulate at least some acoustic treatments for the first reflections (side, back, top of your monitors). for this i placed HOFA absorbers at the different walls. use the "mirror priciple" from your head (sweet spot) to the wall and back to the mons to find the reflection areas to primarily treat. for bass absorption i use HOFA bass traps - places in the corners where the most bass energy could be "trapped" typically (but even here, experimenting with ears and measurements could help further).
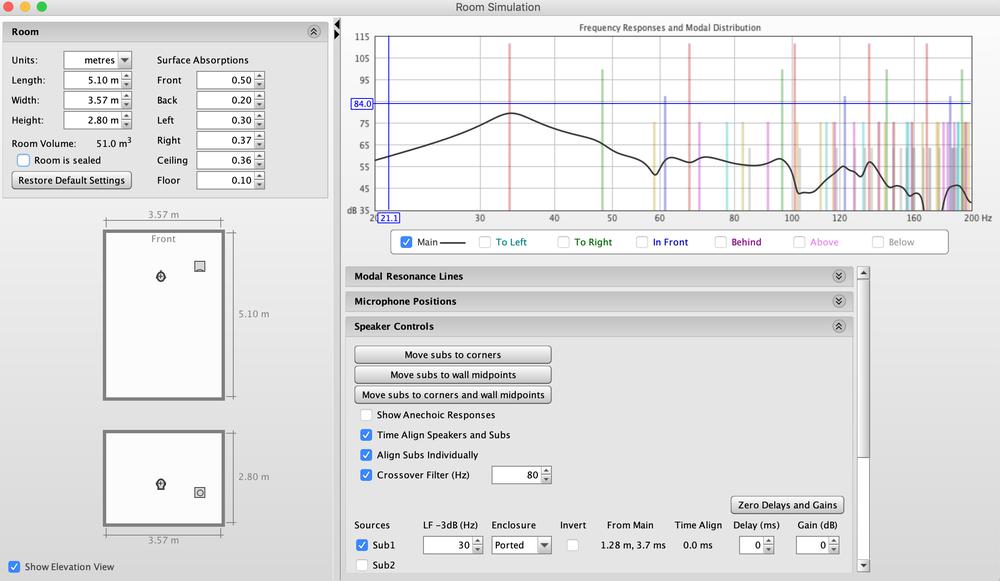
REW - room sim of my studio room
it shows i.e. a primary room mode expected at 37 Hz (which could be found in our spectrograms too easily...)
hear your room modes
room modes will often react less linear to any of your EQ changes - as frequencies areas out of phase optimum. knowing and learn to hear them is helpful furing room correction and your work at all.
use the signal generator of REW to dial into your main room mode, then your secondary etc. while going trough your room and hear at typical locations: room center, half to the center, near the wall etc. to hear how the modes ("staying waves") are staying in your room. i.e. in the room center (or half to) the signal is "away" while it gets louder to the walls or more far from this "quiet" locations. typically you will hear a drastic change in volume if you hit a room mode by slowly sweeping your sinus by hand trough the bass frequencies.
hearing the modes help you to "hear" your modes and understand better what they do to your audio - "how your room sounds", because room modes are typically primary acoustic problems even the coolest mastering studio engineer still has to fiddle with in any way. acoustic treatment as room correction could lower the problem significantly, but not eliminate it. placement does usually "not help at all" here.
correction "by hand" or "full auto"?
REW is a very powerful software and developed as a "EQ modeller" for room corrections. with it's EQ modeller (click on EQ) it offers a complete, yet powerful EQ curve / filter designer. Adam S Control is not listed in the device / model templates yet, but with the generic one - or build a own filter set of for Adam S Control (takes few minutes) - this should be easy.
for me and now i want to go the route "by hand", because i'm not a "high end HIFI geek" who just want "flat as possible sound" on a fixed, calibrated level - i want to "understand" my monitors and their setup, while still have a few room "effects" which many fans / "users" of music products will have in their environment too (in any way). may be that i will produce a step 3 of this series the "full-auto" REW EQ way, but not for now. if you are interested in such a 3rd project part, just leave a note here...ß)
initial REW measurements
i select the PURE profile on the monitor (i.e. by the back panel or with ADAM S-Control) and run the first measurement.
then i open the "measure" dialog and select:
- Length: 1M (more "buffer" allows more exact measurements, but takes longer)
- Repetitions: 3 (use more if you have sporadic disturbing noises in your room)
- if you have aloopback cable installed (see REW manual) select "loopback: cable"
for graph smoothing i use the "graph" -> "psychoacoustical smoothing" as this should make most sense in our application here - it smoothes correlated to our ears perception of frequencies. it could makes sense to temporarily use a higher graph resolution / less smoothing if you want to fit/tweak a smaller Q of a filter at later time - but this smoothing should give a good orientation.
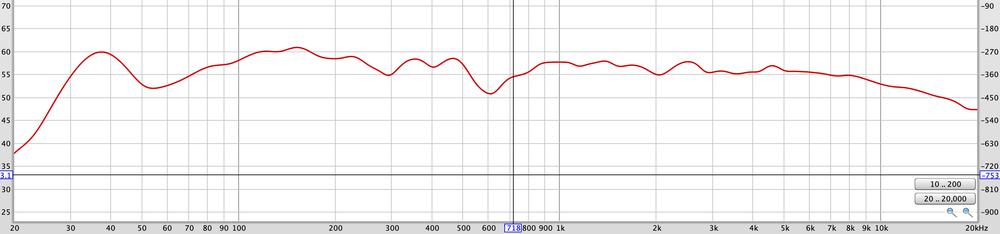
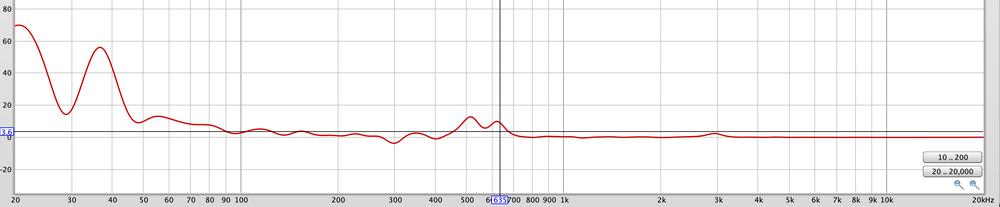
SPL & phase - PURE profile measurement
if i compare it with my room calculator sim, that simulation and practice differs sometimes in life / tech...ß)
phase excess(es)
to find areas of suboptimal phase alignments where EQing would less to not help, because of effecting "interference"(where i.e. any EQ shift would result in more interference signal against the source signal), the "Excess Group Delay" graph is helpful.
this graph is generated by switching over to the "Group Delay" tab, click Control and there "Generate minimum phase".
while the math behind may be a bit tiring for many of you here, you have to remember primarily: as more far the graph is from ±0, as "less sense" it will make to treat by the room eq. you could try it, but you have to expect any unwanted results as no change or even more worse results (even in shifted anomalies in spectrum). you can try to work/experiment here against with acoustic room treatment or relocation of your monitors (i.e. more far from the next walls, floors, ceilings...). if interferences result in a dip or notch area, you could try to shift here with eq but usually you have to spend much more headroom then it makes any sense. where they sum up instead (volume "peaks"), lowering with EQ could help more often. in any case - but even more in such areas - double check with your ears.
Adams S2V room correction EQ does not affect any phase alignment (as analog filters), as it consists of digital filters. the filters does not affect the phase alignment at all (what is what you typically want on monitors).
more about minimum and excess phase alignment is explained in the REW manual here.
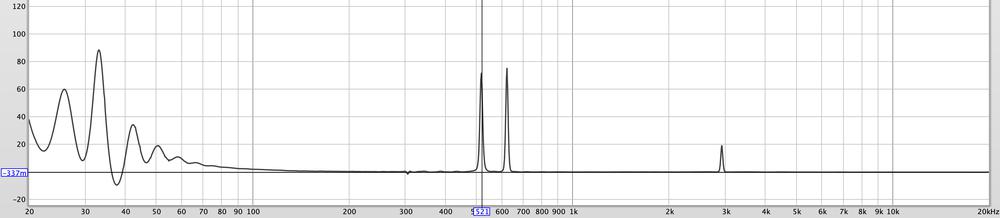
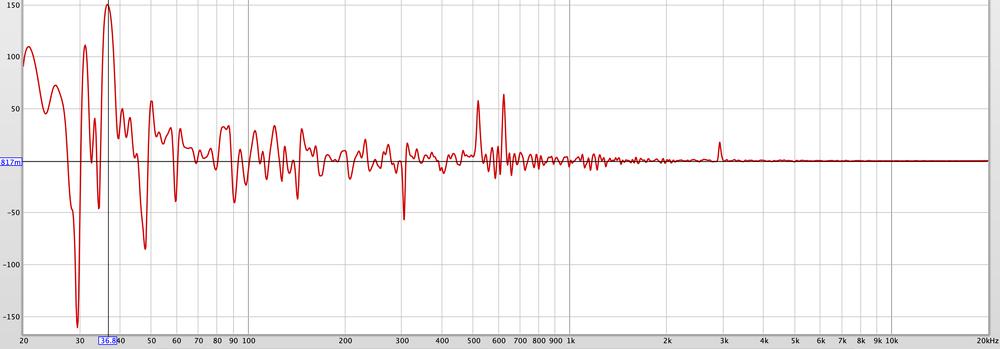
REW Excess Group Delay - 1/48 smoothing
you may try to remove any smoothing to see the (typically) very high but narrow peaks / notches of "distance" from minimum phase delay.

REW - Excess Group Delay (no smoothing)
the peaks and notch around 320 are very narrow and smoothed out in the 1/48 graph.
now we have an idea of frequency areas where EQ treatments might not react as expected.
global distortion
the global distortion graph typically shows issues in the same / similiar frequency areas as the Excess Group Delay graph. these areas are primary candidates for any physical room treatments with absorbers and/or diffusors. i assume my peaks at around 521 + 624 Hz come from my studio desk surface (wood) which are in such a "distance". disturbances in the low areas (bass) may be checked again with phase shift on the subwoofer as in step1.
the frequency peaks / notches allows to calculate "which distance" from the mons to a wall / surface on the way to your spot may influence here. this makes it easier to find the right locations as the right type(s) for absorbers / diffusors.
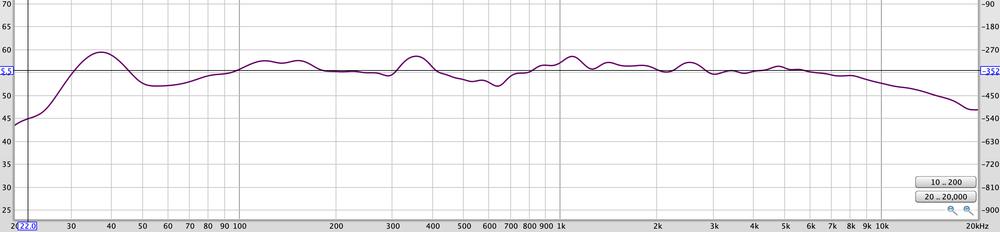
GD (global distortion) - PURE profile - psychoacoustic smoothing
typically it shows issues in the same / similar frequency areas as the Excess Group Delay you may try less smoothing to see more narrow frequency areas of "distortion" where any room treatment could makes sense to reduce these.
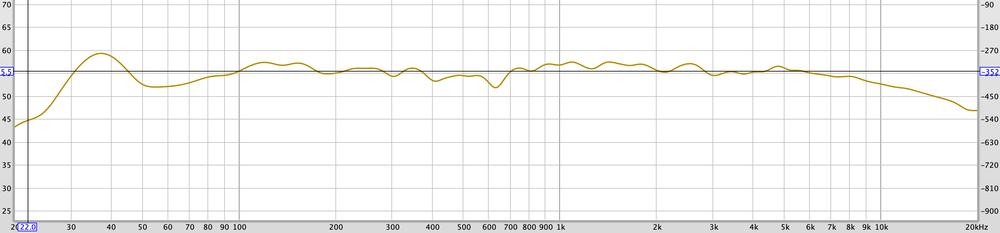
(GD) Global Distortion graph - 1/48 smoothing
"mastering the Q"
to dial in the correct Q you have to know wich Q spans the area you want to effectly change.
here is a short reminder:
|
Q Setting |
Bandwidth |
|
0.7 |
2 Octaves |
|
1.0 |
1 1/3 Octaves |
|
1.4 |
1 Octave |
|
2.8, no 2.9* |
1/2 Octave |
if you want it more in detail, there are a few EQ Q calculators available in the web or even some more math detail.
to remember the width of octave bands, this could help you.
instead of this you migh use any graphical equalizer like Fabfilter, Sonnox or WAVES with spectrum view to find / test a matching Q.
room correction steps
as a first area i want to bring down -3db at 160 Hz with Q 0.9
SPL & phase - after the correction at at 160 Hz
-1.5 at 355 Hz with Q 4
SPL & phase - after correction at at 355 Hz
a tweak to much...
I tried then to shift 630 Hz with a relative narrow Q about 2db just for test, but as expected from the GD graph the result was not helpful. the "dip" shifted a bit left/down in freq while the whole curve got less smoth by any other interactions which it seems i've shifted.
so i was finally going back to ±0 there.
result after shift on 630 Hz which seems more "ugly" to me then last result - so i wasted it...
with the tab "All SPL" i can view all my curves as overlays for comparing them again:

REW "All SPL" - curves 1-3
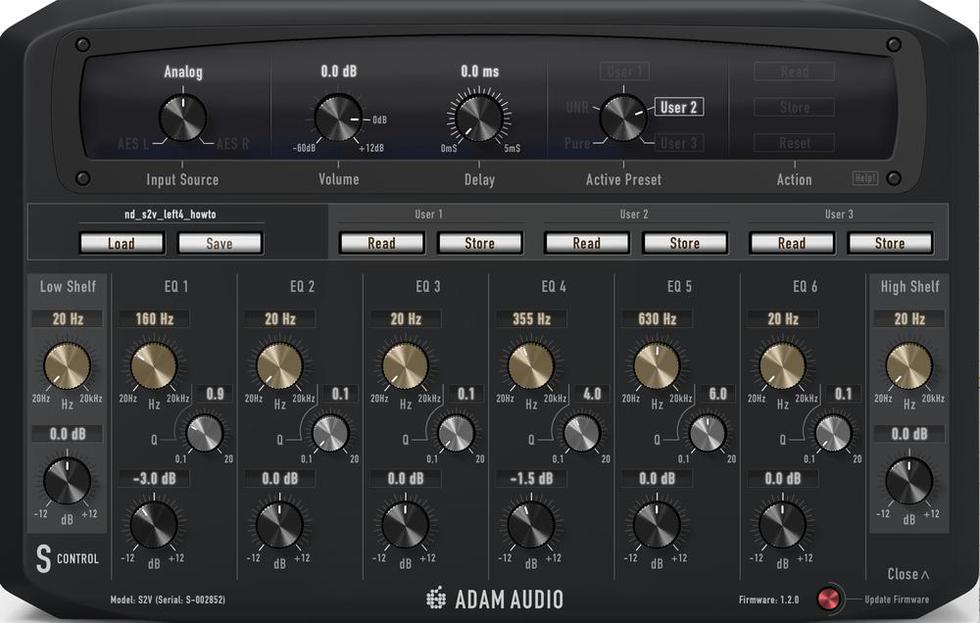
resulting profile
after these tweaks i've landed with this room correction profile i saved for now:
- -3db at 160 Hz with Q 0.9
- -1.5 at 355 Hz with Q 4
this might be still not "optimal", but for now it is time to hear some references and try to work with to get a human "view" onto as a more even curve might be reducing my sweet spot further (what further tweaks would bring).
")
")
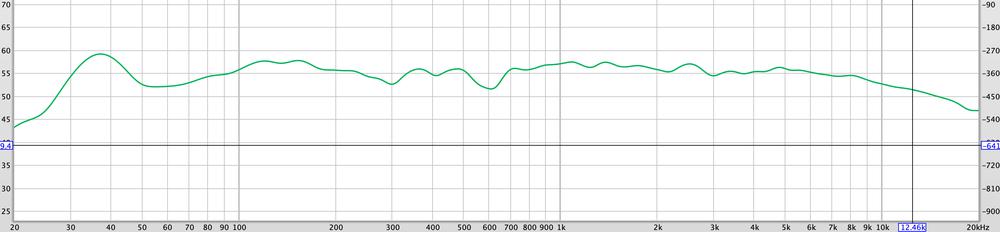
Adam audio S control on Adam S2V after room calibration (both monitors - user profile 2)

SPL & phase - after correction at at 355 Hz
")
")
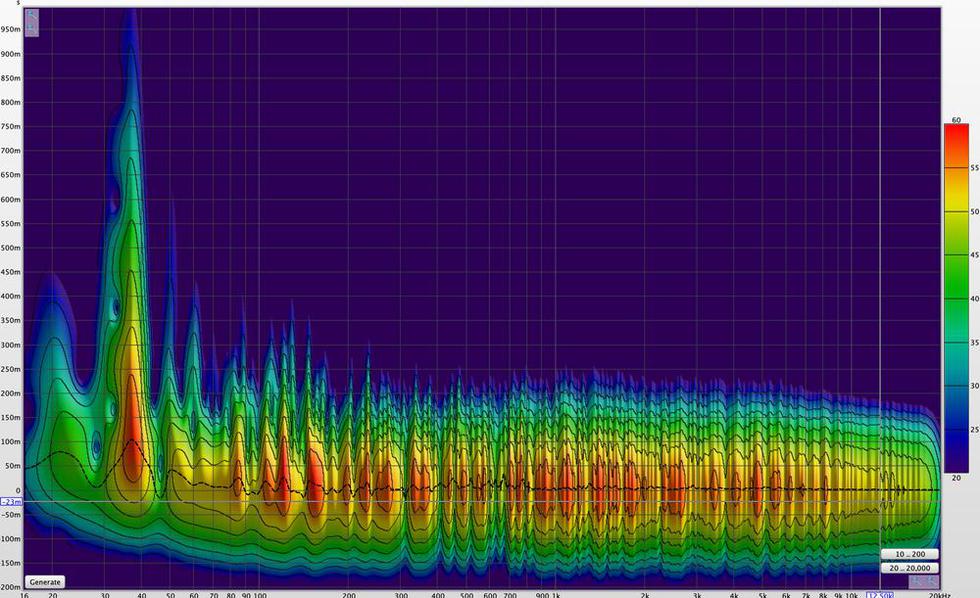
spectrogram over time
this seems significantly more even to me then before.
it seems, my room mode at 37 Hz which still takes more then 300ms to fall > 60db is the only thing i still have "hard to fight" with - but this should be targeted by any further physical bass traps (as i.e. helmholtz-resonators should be to large for that frequence i assume). they "catched" my 125 Hz mode relative far. my 50 Hz dip seems to need further attention in the next too - will check this after my next bass trapping changes too.
the result may be not so detailed / "exact" as with the automatic REW EQ modeller tool, but it is (for now) more flexible to me. if you are interested in a step 3 of this blog project pls let me know this - in the bottom diuscussion or by mail.
so far for now - i need time to try my setup in practics - may be i come back to this anytime in future...ß)
any comments welcome.